Zoho CRM is a cloud-based customer relationship management (CRM) platform. It helps businesses attract, acquire, and retain customers. It provides a suite of tools and applications to help businesses better manage their customer relationships. including sales, marketing, customer support, and analytics. Zoho CRM has tools for managing customer contacts, creating automated workflows, tracking sales opportunities, and more. This CRM admin guide will help new admins get up to speed with the basics of Zoho CRM. So they can start using the system to its full potential. We’ll cover the basics of setting up and managing users, customizing the system to fit your company’s needs, and more. With this guide, you’ll have all the information you need to make the most of Zoho CRM and make your job as an admin easier.
To know more about What is Zoho CRM and the Importance of Zoho CRM for your Business refer to What is CRM Software: The Complete Beginner’s Guide
Role of Admin in Zoho CRM
As an admin in Zoho CRM, you are responsible for:
- Managing user access
- Creating and Maintaining databases
- Configuring custom settings
- Creating custom fields
- Creating and managing user roles
- Configuring security settings
- Monitoring user activity
- Generating reports
Create your Account as CRM Admin
Get started on your learning journey of Zoho CRM by creating an account. It is the first step before learning the Zoho CRM features.
Do follow the below steps to create an account in Zoho CRM:
Browse the Zoho website www.zoho.com
Select the CRM option among the Zoho products. And get started on creating your own account.
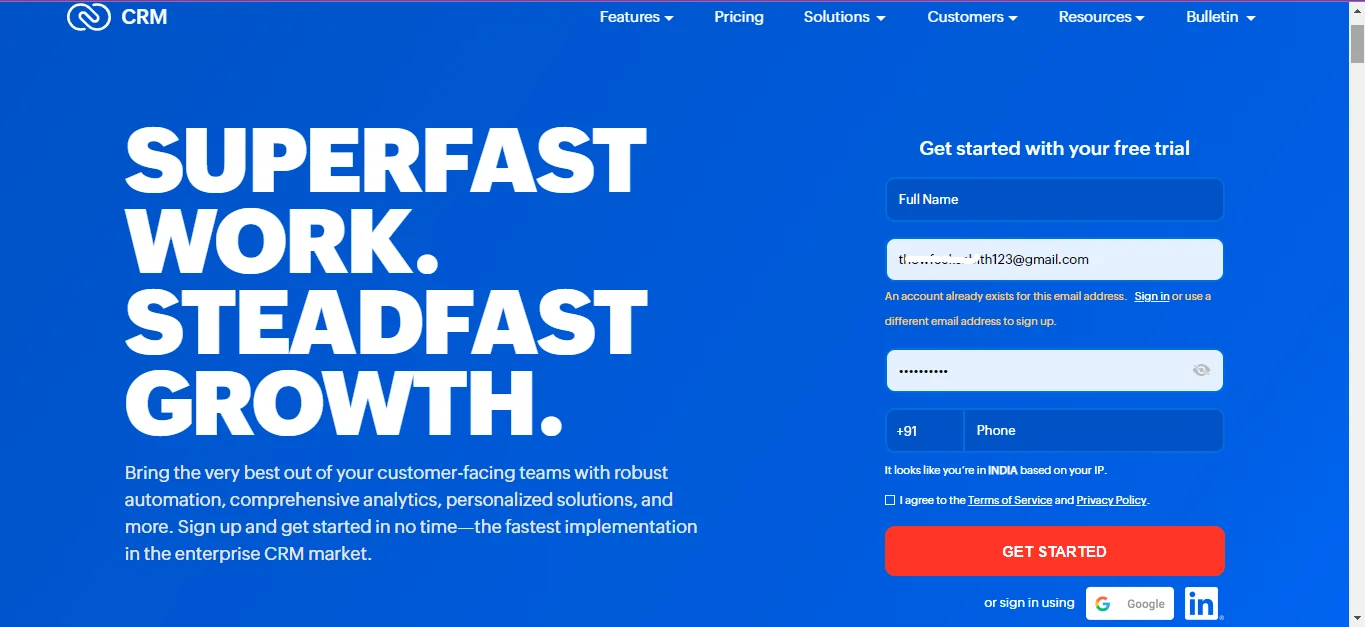
Provide your Login credentials such as your name, email address, and password.
You will get a confirmation email on account creation. Verify the email address. And That’s it. You have successfully created your Zoho account.
Once your account is created, you will be landed on the page to select the Zoho Pricing Plan. You can start a free trial of 15 days or you can directly select your plan based on your business needs.
Pricing plan
Based on the number of users, customization features, and data storage, Zoho offers five different subscription plans for their users.
Free: Only for three users
Standard: $20 for monthly billing or $14 per user, per month, charged annually
Professional: $23 per month per user when billed annually, or $35 per month per user when invoiced monthly.
Enterprise: $40 per month per user billed annually, or $50 per month per user billed monthly
Final: $52 per user, per month when billed annually, or $65 per user, per month when billed monthly
Admin View
The admin view in Zoho CRM is the main view for administrators to manage the CRM. It provides an overview of all the modules in the CRM. And also the various settings and configurations that can be made.
It also provides access to user management, workflow management, and other administrative functions. The admin view is available to users only with the ‘Admin’ role.
Admin Settings
You are referred to be the system Administrator, or Admin if you were the CRM’s first developer and user.
You have the authority to add and remove users and control their permissions. Because you are the administrator of all other users’ settings with this role.
It is up to you, the Admin, to design settings that meet your needs.
As an admin, you need to set up your personal and organizational data via Set up.
Personal Settings
First, personalize your Zoho account by setting up desired language and time Zone for your team.
Go to Set up << General << Personal Settings.
You can add your unique signature for your business email that you need to send via Zoho CRM.
per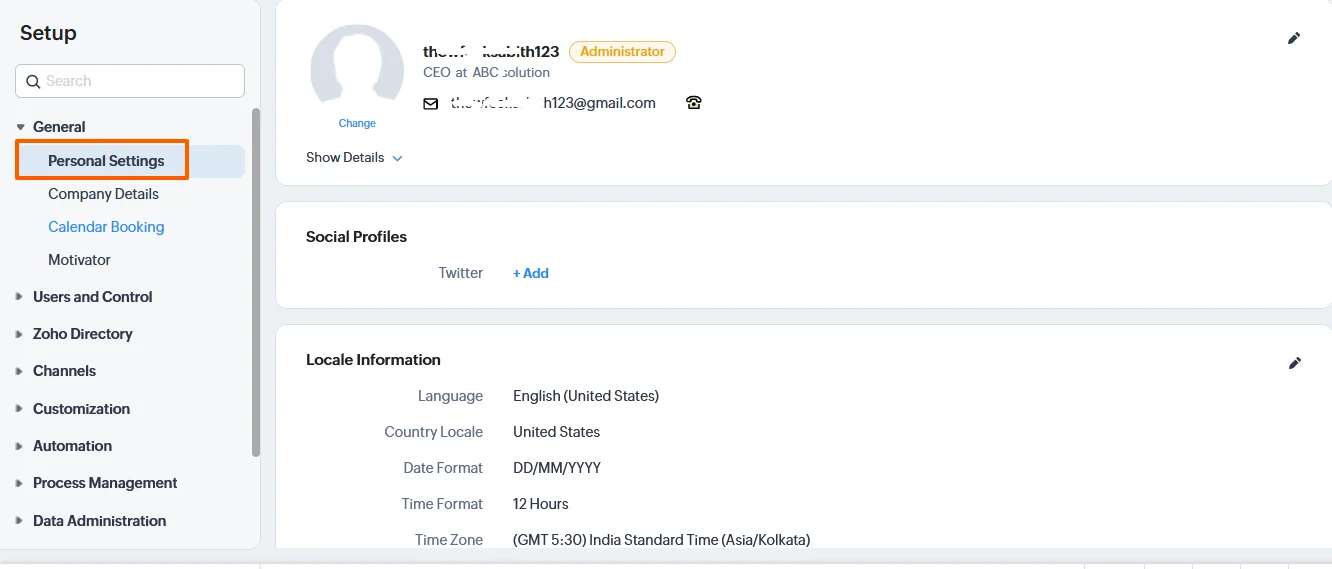
Organizational Settings
Once the personal information setting is complete, you can create your company profile.
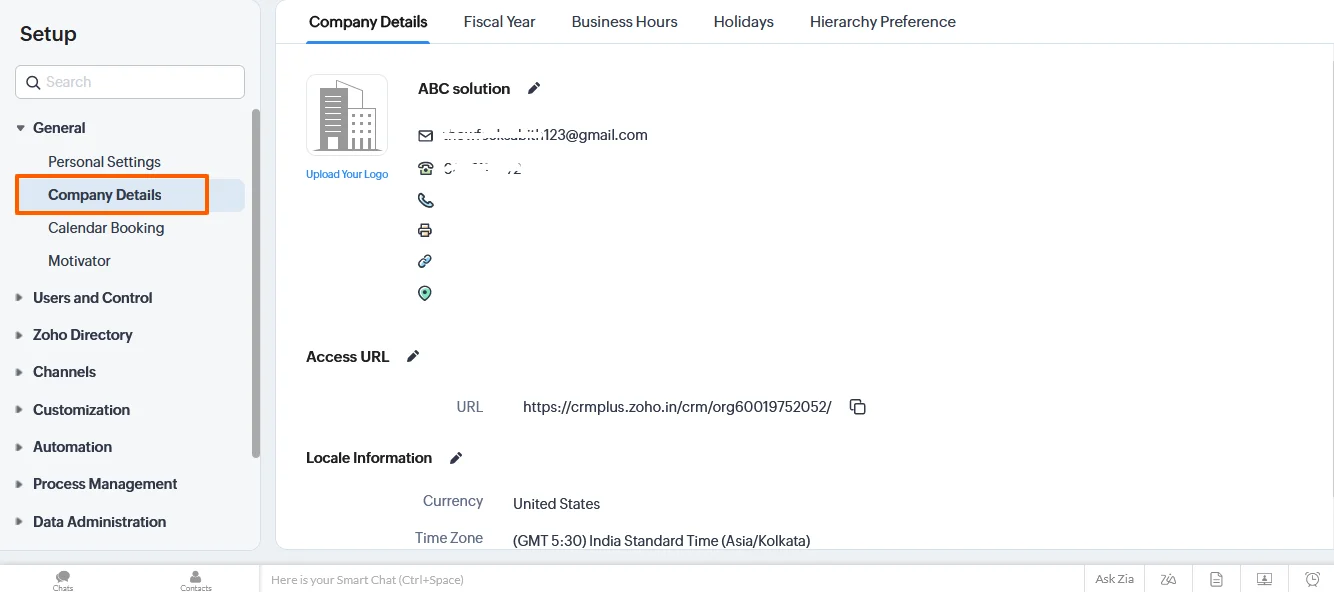
Navigate to the Settings menu and select Company Details under the General column. Here, you can enter relevant information about your organization. It includes company details, fiscal year, business hours, and standard currency.
Company details
For all business communication, add the following company details
- Company Name
- Country Locale
- Time Zone
- Company Logo: Please use an image file with a size not exceeding 10MB. And best results with 190 (width) by 65 (height) pixel dimensions.
Fiscal Year
Set up the Fiscal year of your company. It may not be the same as the calendar year. The Fiscal Year is generally used for preparing financial statements. In the Fiscal year section, select the starting month of your fiscal year. Then the fiscal quarter will be rolled up automatically.
Business Hours
Your organization’s teams may work in shifts based on various time zones and at different business hours.
Establishing your business hours will be useful when using the case escalation rules to allocate cases to people.
Email Settings
Set up your email account in Zoho CRM using IMAP to handle email and sales from one location.
Configuring Users, Roles, and Permissions
As the CRM account was being set up, the next step was to add users. And determine what roles and permissions they would have. Every user was given a sign-in with their email address and password, and then their role within the organization was assigned. The CEO and Manager roles were available by default. But the company was able to add more roles based on its structure such as sales manager or sales rep. These roles were set up with a hierarchy to allow for appropriate levels of access. It is depending on the user’s position. It was an essential step to ensure that everyone had the correct access to the data they needed.
Adding Users:
Add users and give them responsibilities and profiles in your CRM account. Remember that you won’t be able to add new profiles or roles until you add a user to your account. The system-defined position (CEO, Manager) and profile (Administrator, Standard) can be assigned to the first user that you add.
You can add users by navigating to Settings<< Users and Controls<< Users<< Add New User. 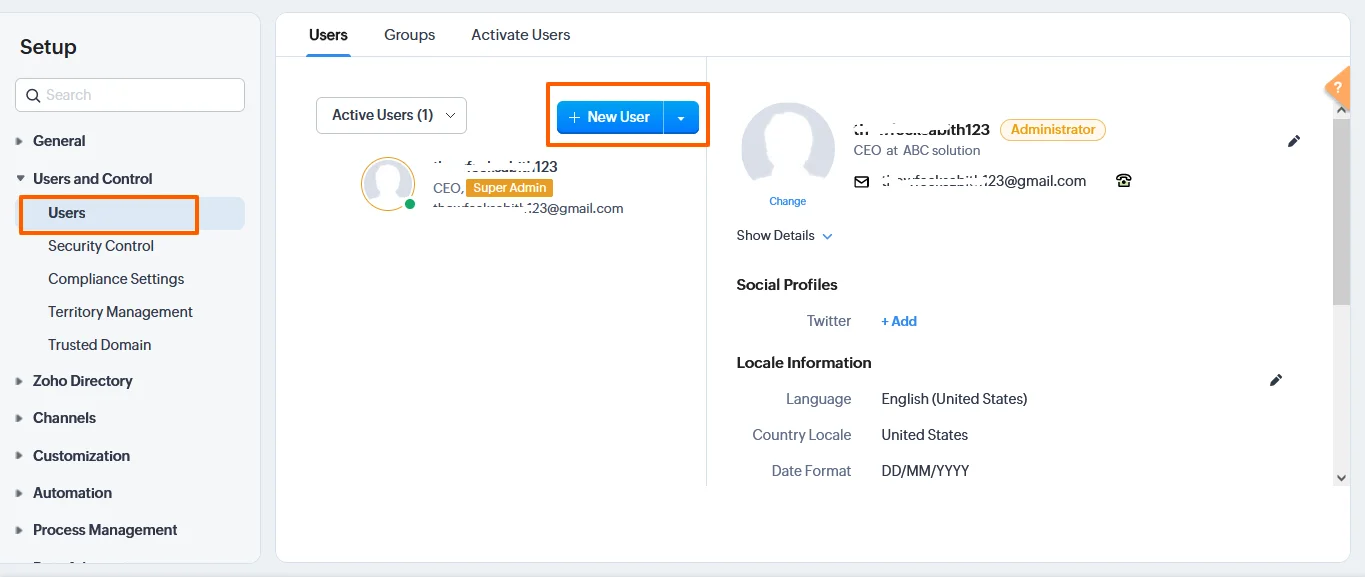
If required, enter the requested personal information, such as their name and email address.
Then, choose their position inside your company as well as their profile.
Their access rights are based on their profiles. They can have profiles at the Administrator or Standard levels.
Users with Administrator rights have full access to all data and modules, whereas users with Standard rights only have access to the roles and security restrictions specified by the Admins.
The user will receive an email to complete their registration and have access to the CRM once they have been added.
They can alter certain aspects of their system experience, such as layouts and home page views, much like the system administrator.
They can also begin utilizing the features and working together on projects and business transactions.
Adding Roles
Create a Role and assign it to the user based on the organization-wide hierarchy.
To create a New role,
Set up<< Users and Controls<< Security control<<Roles<< New Role 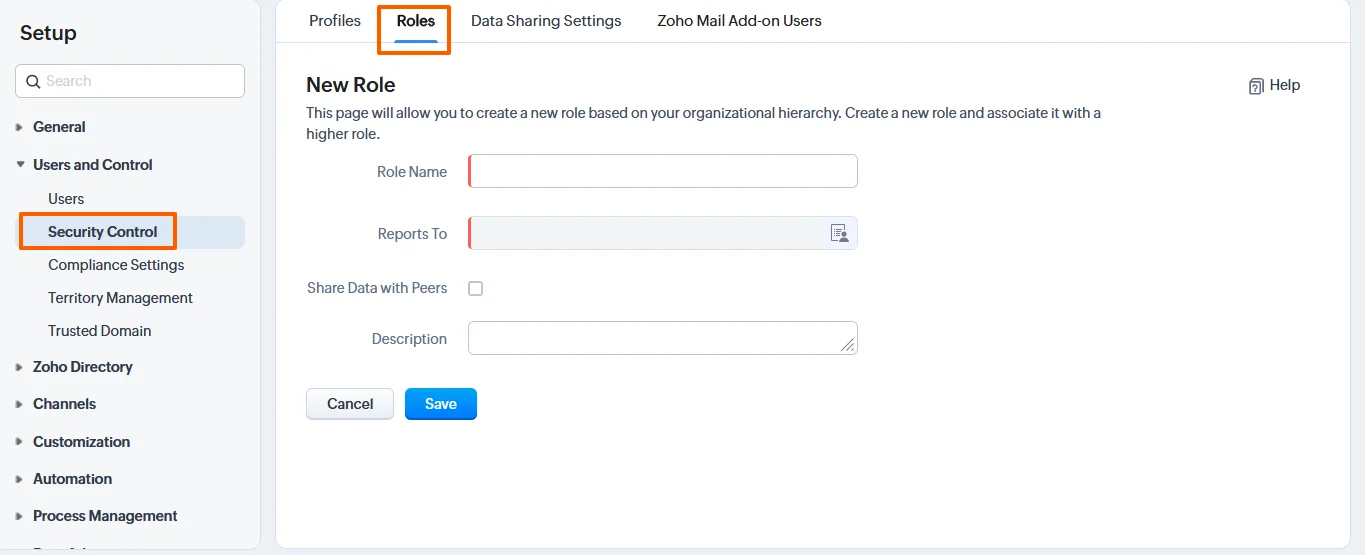
Provide the following details to create a new role:
Role Name: Enter the unique Role name.
Reports to: Provide the immediate superior role to the newly created roles. If you don’t provide the superior role, then the new role will be under the CEO by default.
If you want to grant peers access permissions, check the Share Data with Peers option.
Then Provide a description of the role and click on Save.
You can assign roles to any user by selecting the particular user from Setup<User Permissions
Users get access to a set of tools and features with the defined permissions. The collection of permissions is said to be the Profile. Once the responsibilities of the users have been established, you will be able to construct profiles. And assign them to the appropriate users with greater clarity. This is based on the kinds of tasks you want them to complete within CRM.
There are two different categories of default profile permissions:
Administrators: Users with full system access.
The full data and functionality in your Zoho CRM account must be accessible by at least one Administrator.
Example: CEO, top officials, or top management, for instance.
Standard profile:People have access to data based on their stated organizational roles and permissions (profiles).
Example: Managers of Sales, Marketing, and Customer service
You may also use the manage profile permission option to restrict or permit access to particular services depending on your company’s needs. For a certain project or deal, different team members may need to contribute. In these circumstances, you can enable the data-sharing rules to allow teams and departments to access a record continuously.
To create permission or Profile,
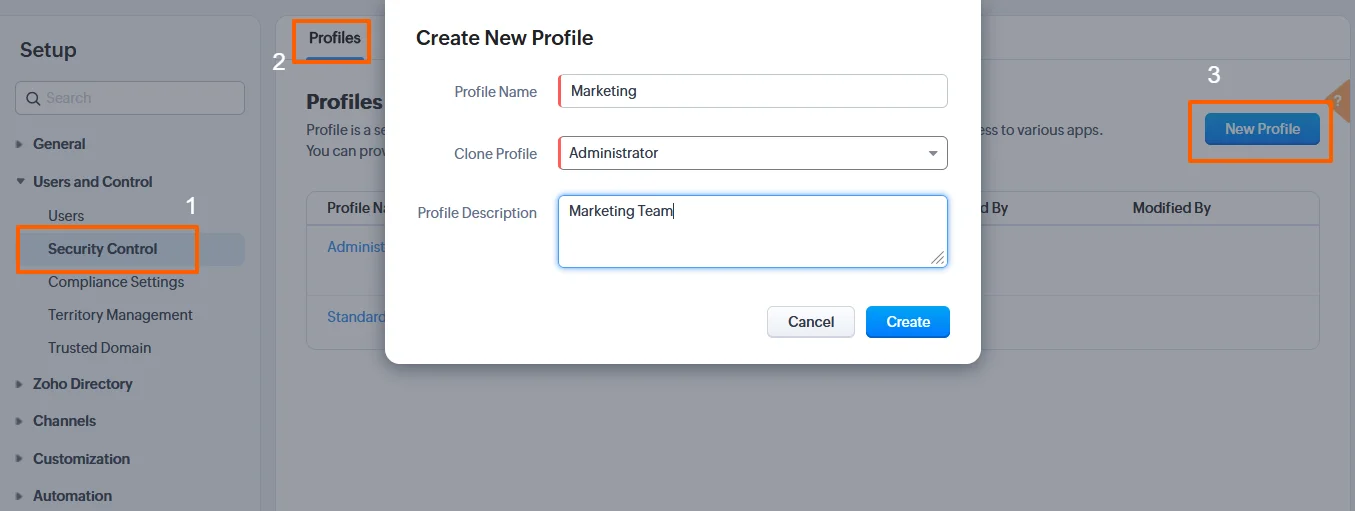
Navigate to Set Up<< Users and Control<< Profiles <<+ New Profile Provide the profile name, cloned profile, and profile description. Then click on create. You might occasionally want to create identical profiles by cloning others and then customizing them as necessary. Click the more button next to the profile name, then select Clone to copy the profile.
What are the Admin Level Permissions?
Only the admin user can customize the Company Information, Fiscal Year, Business Hours, Territory Management, De-duplicate, CRM Variables, Copy Customization, Organization Email, and Currency.
The other admin-level permissions with their descriptions are as follows:
User Management: With User Management, the admin can
Manage users, roles, and permissions, Set profile permissions for other users, and Set & Manage data sharing rules.
Module Customization: With Module customization, the admin can
Customize Modules, Tab Groups, and Webtabs.
Create custom fields, layouts, related lists, Links & buttons, business card view, and Kanban view.
Wizards: The admin has permission to configure Wizards and set Wizard as the default layout for other users
Manage portals: Admin has the access to create and edit portal configurations.
Manage Calendar Booking: Activate & deactivate the calendar, share calendar bookings, and send invitations
Copy customization: The admin can copy customization from one CRM to another.
Manage Compliance settings: Manage the GDPR compliance
Translation: the admin have the access to set up translation, add language, and Import & Export language file.
Customize Modules & Fields
As an admin, you can create and customize the modules based on your unique business requirements. It is simple by navigating to Settings << Customization<< Modules &Fields
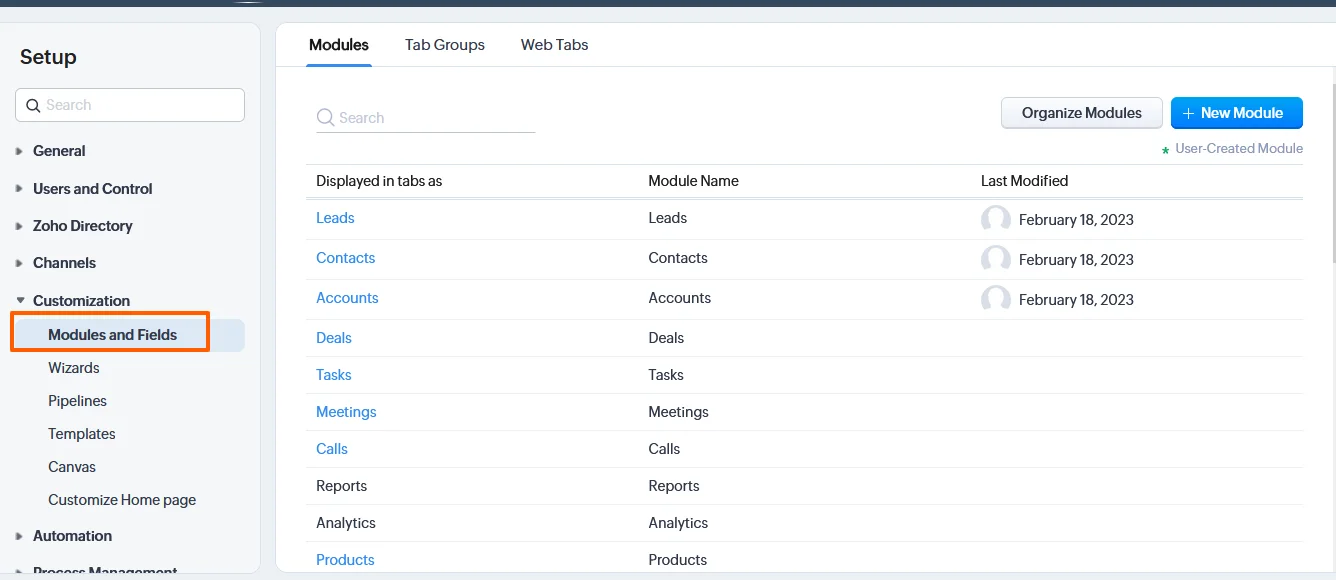
Modules are defined as how Zoho CRM’s functionalities and related data are organized.
Users can work together and communicate the status of sales prospects, marketing campaigns, and customer support initiatives using modules.
Leads, Accounts, and Contacts are a few of the preconfigured modules that Zoho provides by default. And that you can easily update it.
You can also create a new module by clicking “+ New Module” on the Modules and Fields customization page,
Or you can edit the existing module by choosing the module you want to alter.
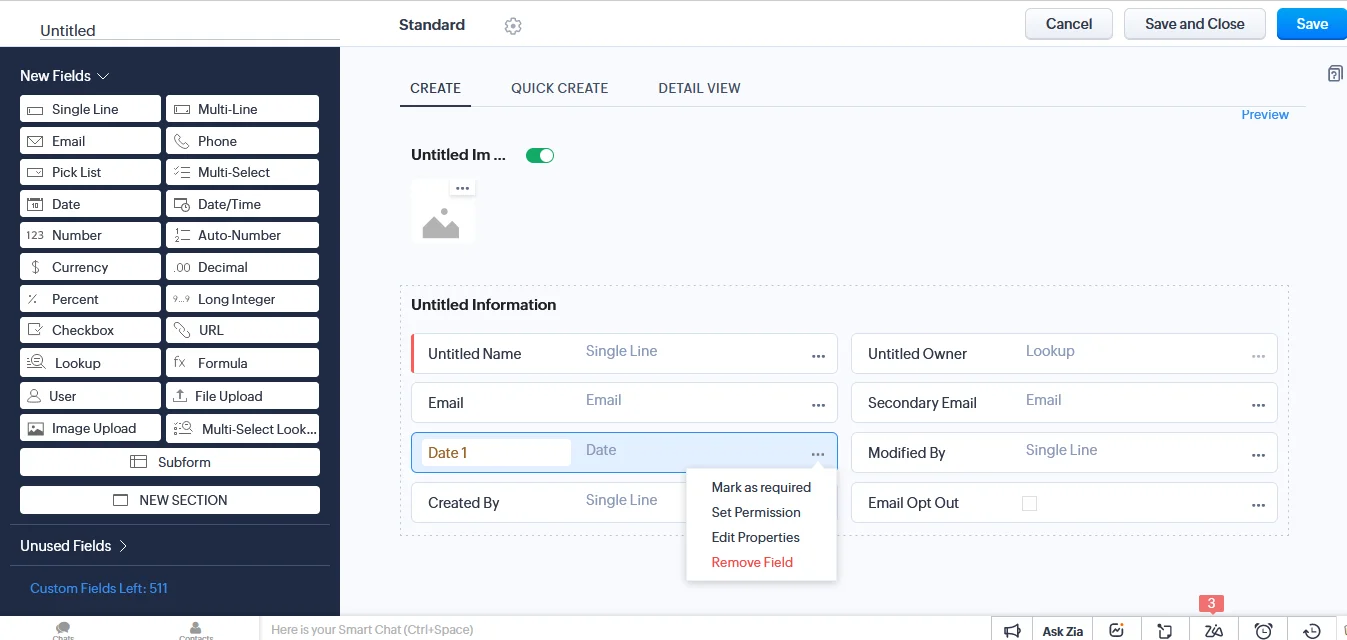
You can simply drag the new fields you want to add from the Left side menu and drop it inside the place wherever you want.
Add/Edit Data fields
Creating a new module includes adding data fields for the types of data you wish to gather like email addresses, phone numbers, dates, and currencies.
Editing data field attributes include how the data is gathered. It includes single-line formats, check boxes, or choices for multi-select data fields
Also, you may change the permissions inside each module to control who has access to the data.
You can also remove the field by simply clicking on the three dots of the desired field and selecting Remove fields
Create Records
Using many sources, you may gather data on leads, deals, quotes, and more, adding them as records to the modules.
There are several ways to add these records to your CRM account. That is by manually, by importing them, or by collecting the data via online forms.
You can manually add records to the CRM module if you just have a few records.
The following techniques can be used to independently produce records:
- Completing the required fields in the record creation forms.
- Duplicating the record with just minor changes to the current information.
Importing and Exporting Data
Managing your CRM data is crucial for maintaining a clean database. It also increases the CRM quality.
The two main processes of Managing CRM data include
- Import data from external sources to CRM
- Export data from CRM to external sources
Steps to Import and Export data
You can easily import your data or other users’ data into your CRM.
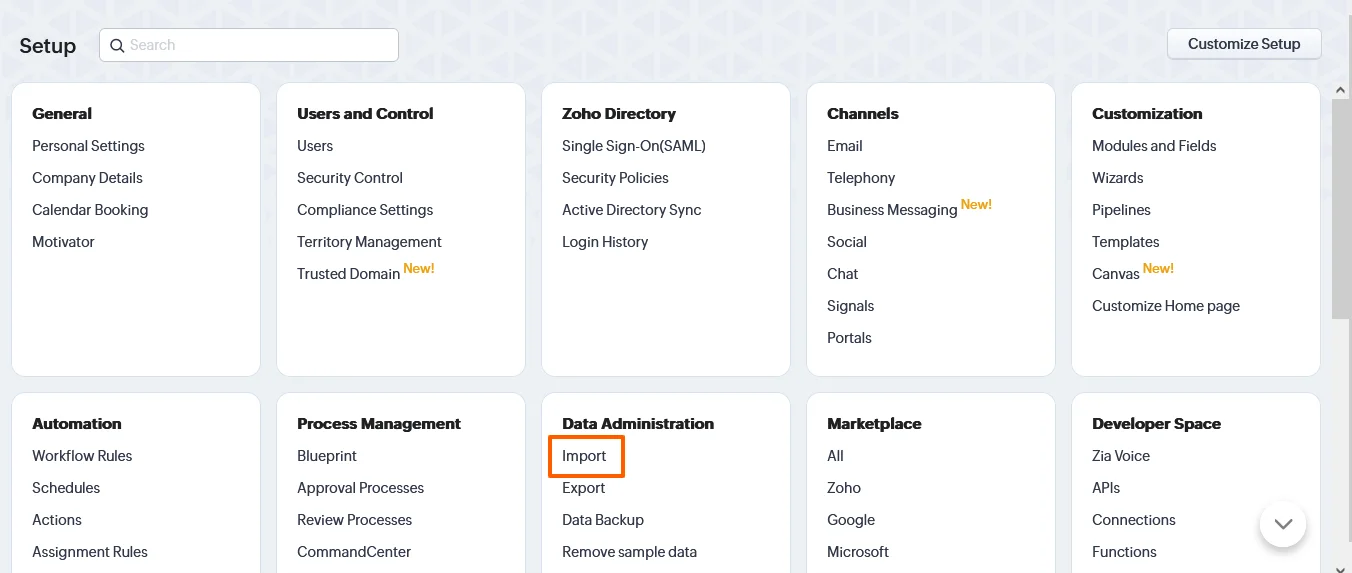
To import any records or CSV files from other CRM,
Go to Set up<< Data Administration<< Import
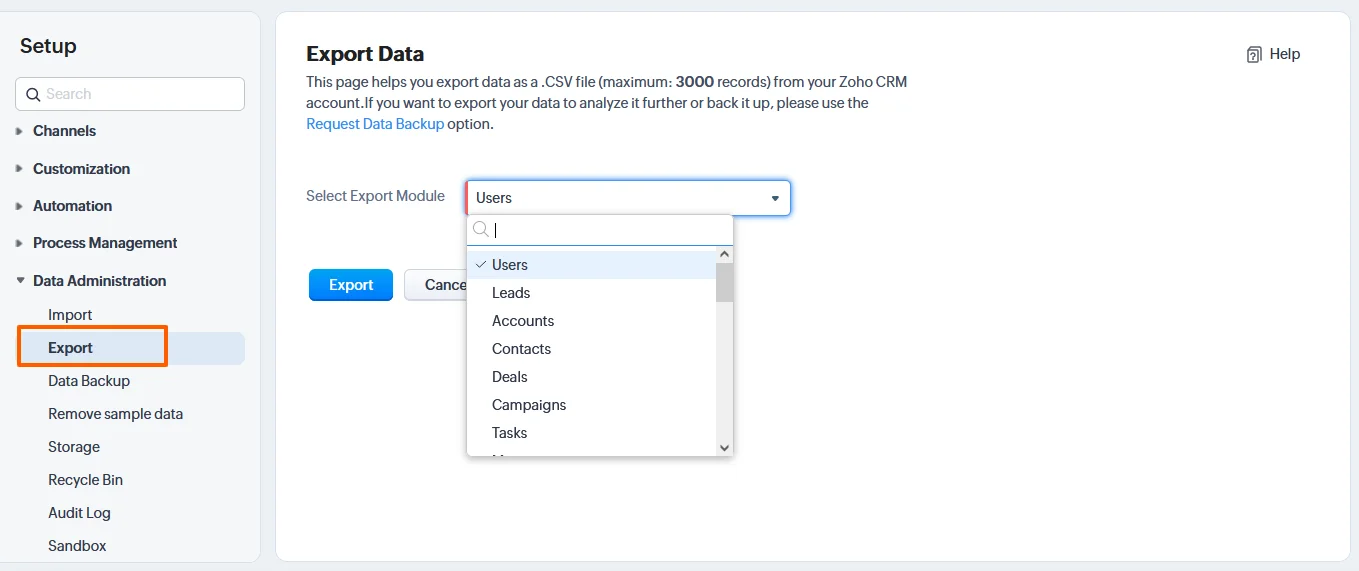
To export records from Zoho CRM to external sources,
Go to Set up<< Data Administration<< Export
Managing Duplicates
In Zoho CRM, it is easy to arrest duplicates before it was created. This is through unique fields. For example, You assign the email addresses of the lead as a unique field. Then you will receive an alert if the record with the same email address is entered.
You can define a field from any module as “Unique” in Zoho CRM. These fields, once marked as “Unique”, then they are crucial for controlling duplicate records in Zoho CRM in a variety of situations including manual record generation as well as records created through import, APIs, lead/sales order/quote conversion, and manual and automatic record creation.
A field can be defined as unique by the administrator or a user who has Customize Zoho CRM profile access. You can stop the creation of duplicate records in a module once a field has been designated as unique. It is done by using manual creation, imports, integrations, web forms, and other methods.
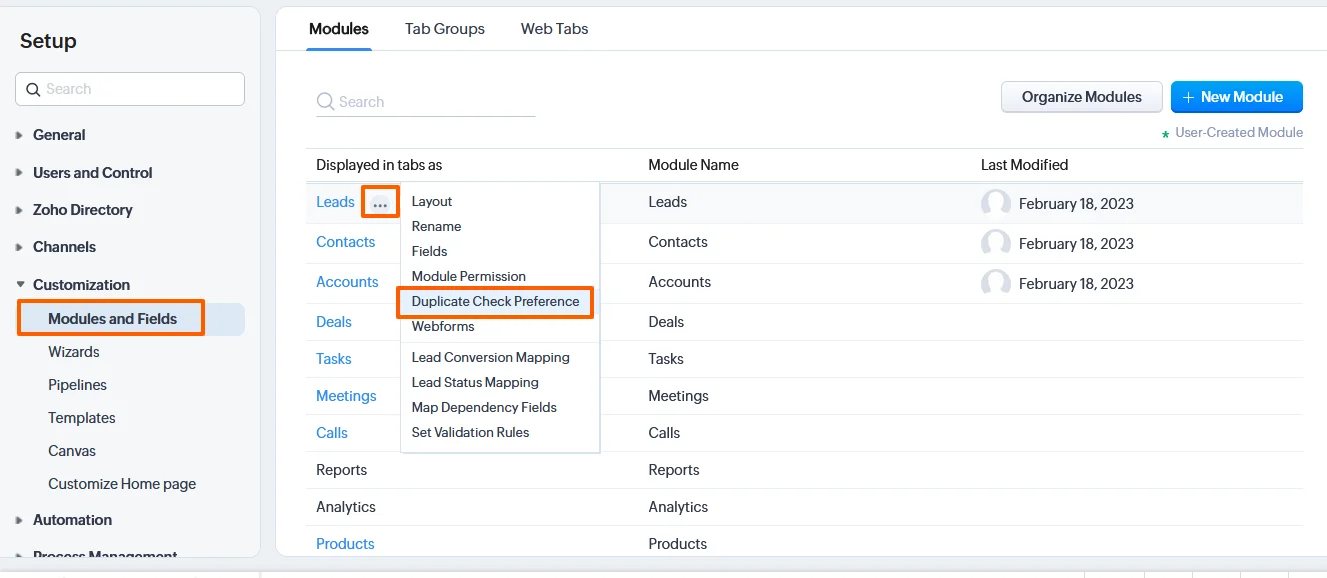
You can enable the duplicate check from
Setup<<Customization<< Modules and fields<< Leads<< More<< Duplicate check preference
Bottom Line
This Zoho CRM admin guide provides administrators with the information they need to effectively manage their Zoho CRM system. It is a valuable resource for administrators to understand the system and its many features, as well as how to troubleshoot common issues. With this guide, administrators can optimize their Zoho CRM system and get the most out of their investment.