Integrating Zoho and QuickBooks Online boosts up your customer engagement and experience. It helps to maintain up-to-date customer info and inventory information in both connect zoho CRM and Quickbooks. It becomes easy to share data like Quotes, Sales Order, Products, or Invoice to your clients whenever they ask you. Here in this tutorial, we uncovered the complete working process of connect Zoho CRM QuickBooks Integration. Read on the entire blog to know the Zoho CRM QuickBooks Integration.
Introduction to Zoho QuickBooks
Connect Zoho CRM & Accounting software
There are so many benefits for businesses in connecting CRM with accounting software. It enables easy automation of operational works which reduces the workload, time, and effort of your customer service team. Businesses can now only concentrate on their core business development and maximize productivity.
Benefits in our Zoho CRM QuickBooks Integration
Zoho CRM QuickBooks Integration gives a transparent view of customers data to your finance and customer service team. With this integration, the data in Zoho CRM and Quickbooks accounting can be synced bi-directionally between both platforms. You can perform different methods of data sync like on-save record sync from Zoho to QB, automated cron sync from QB to Zoho, and selective records sync from Zoho to QB.
Zoho QuickBooks Online integration extension lets you sync modules:
- Contacts/Customers
- Invoice
- Quotes/Estimate
- Products
- Sales Order/Sales Receipt
The extension supports multi-language so that users can access it in different languages. The currently supported languages are English, French, and German. To set up or update languages, navigate to “Settings → Languages”. Choose the preferred language from the dropdown and click on the ‘Update Language’ button.

Step by Step guide for Zoho CRM QuickBooks Integration
Follow the step-by-step guide below to authorize, configure, and work with the connect Zoho CRM QuickBooks add-on.
Install the extension
The very first step starts with installing the extension from the Zoho marketplace.
- Visit our Zoho QuickBooks extension in Zoho Marketplace
- Install it in your Zoho CRM
Register as a new user in the extension
On Zoho CRM, click on the three horizontal dots present on the top menu bar. There you will find the ‘Zoho-QB_BiSync’ submenu. Click on it to open a new page of ‘Zoho-QB_BiSync’.
Then click on “New User? Register Here”. You now need to register with a username, email address and password. You can reuse the username and password to login the extension.
It redirects to the new page where you will connect Zoho and QuickBooks with the extension.
Authorize the extension
Next you need to authorize the extension to connect with your Zoho CRM and QuickBooks Online account.
Authorize your QuickBooks account
Follow the steps to connect with your QuickBooks account:
- Click ‘Connect to QuickBooks’.
- It pops up a new window. Here provide your QuickBooks Credentials like username and password.
- Click ‘Connect’ to connect with your QuickBooks.
Authorize your Zoho account
Follow the below steps to connect the extension with Zoho CRM:
- Select the ‘Connect to Zoho’ button.
- It opens a window. Here select ‘Accept’ to allow ‘Zoho QuickBooks Bi-Sync’ to access your data to sync.
Perform Field mapping for perfect sync
After you connect with Zoho and QuickBooks, you are ready to perform data synchronization. You can only sync data between Zoho and QuickBooks, after you perform field mapping. You will be provided with two mapping sections, namely:
- Zoho to QB
- QB to Zoho
Locate either of these tabs based on your sync preference. If you want to sync from Zoho to QuickBooks, choose ‘Zoho CRM to QB mapping. Otherwise, if you want to sync records from QuickBooks to Zoho, choose ‘QB to Zoho CRM’. Choose the module you want to sync from the left side. Then just drag the fields from the right and drop in the appropriate fields. Like that, do mapping for other modules and save the mapping.
Different ways of record sync between Zoho & QuickBooks
Zoho QuickBooks Integration lets you perform three different ways of record synchronization. You can,
- Sync particular or existing module records from Zoho to Quickbooks.
- Using the On-save sync feature, with one click on save you can get your Zoho records inside QuickBooks.
- Automated Cron sync from QB to Zoho.
1. Existing module record sync from Zoho to QuickBooks
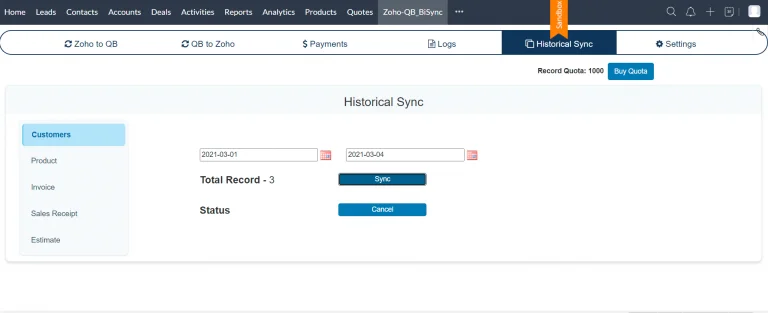
For transferring Zoho CRM records to QuickBooks, navigate to ‘Historical Sync’ tab. Select the module to sync. Choose the ‘From Date’ and ‘To Date’ to sync records created on the particular period. Based on your selection and records found, you can view the total records count in ‘Total Record’. Click the ‘Sync’ button to transfer the records to QuickBooks. You will get the sync status here and you can cancel the sync by clicking on the Cancel button.
There is also another way to sync existing records. Move to the Zoho module record detailed view, there click on the ‘Copy to QB’ button. Your record will get synced to QuickBooks automatically.
2. On-save record sync
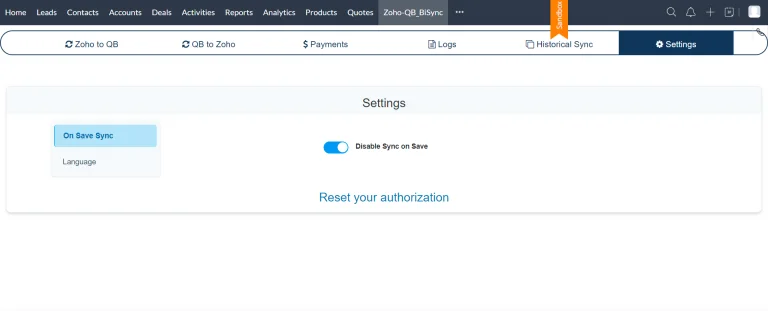
Zoho CRM QuickBooks Integration extension performs ‘at the time’ sync or ‘on save’ sync that avoids human data entry. To make this feature happen, enable the ‘Enable sync on save’ option under Settings tab. Start creating a record inside any of the supported Zoho modules. Save the record. You will get the record automatically inside QuickBooks.
3. Automated Cron Sync
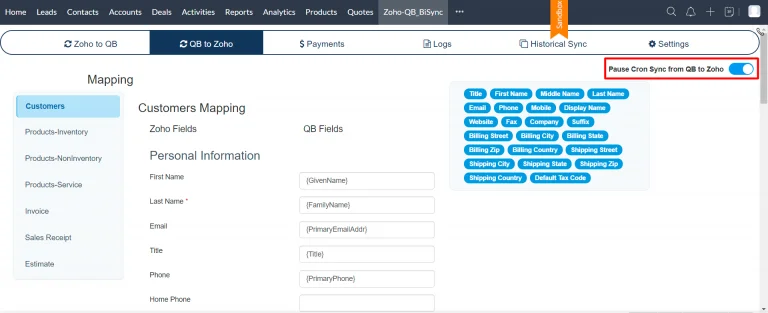
The automated cron sync in Zoho CRM QuickBooks Integration is performed every 5 minutes. This will sync all newly created records in QuickBooks Online to Zoho. To apply this feature, enable the ‘Pause Cron Sync from QB to Zoho’ option present in the QB to Zoho mapping section.
Track sync results & resync failed records
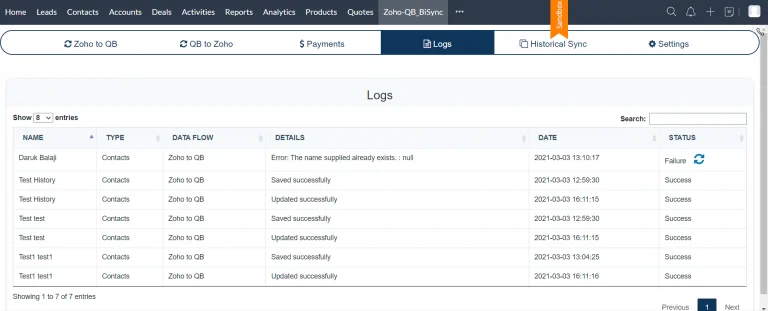
It’s easy to track your records sync results within Zoho CRM QuickBooks Integration. Visit the ‘Logs’ section to get the detailed information like name, module type, data flow (zoho to qb/qb to zoho), details, date and status.
The connect Zoho CRM QuickBooks Integration also provides a resync option to again sync the records to QuickBooks. After you rectify the errors shown for the failed records sync, click on the resync icon of the appropriate failed record sync. The record will be resynced to your QuickBooks account. If it successfully resynced the records, you can get a pop-up with a success message.
Need Help? Contact Us
Try the Zoho CRM QuickBooks Integration extension now in your Zoho CRM and enjoy the cost-worth benefits for your finance and customer service team. An updated version of Zoho QuickBooks Extension is now available. Hope this tutorial helps you learn more about our Zoho QuickBooks integration. If you have any queries regarding this, feel free to write a mail to [email protected]