Table of Contents
QuickBooks Invoicing Basics
Creating professional invoices is a fundamental aspect of managing your business’s finances. QuickBooks provides a comprehensive invoicing system that allows you to customize your invoices to reflect your brand identity.
Key Features
- Pre-designed templates
- Customizable fields and layouts
- Integration with payment options
- Automation of recurring invoices
QuickBooks’ invoicing system is designed to be user-friendly, allowing even those with limited accounting experience to create and send invoices with ease. Understanding the basics of QuickBooks invoicing sets the foundation for further customization.
Accessing Invoice Customization Options
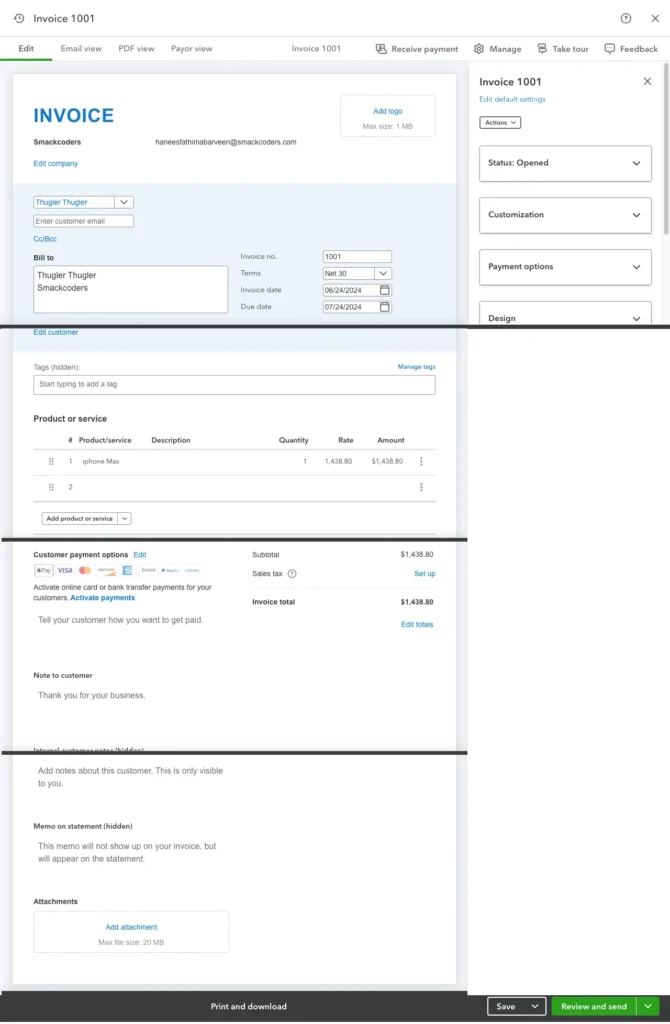
QuickBooks makes it easy to access the tools you need to customize your invoices. Here’s how you can get started:
Steps to Access
- Log in to QuickBooks: Access your QuickBooks account through the desktop application or online.
- Navigate to the Gear Icon: Click on the gear icon in the top right corner to access settings.
- Select Custom Form Styles: Go to “Your Company” and select “Custom Form Styles.”
- Choose Invoice Template: Select the invoice template you want to customize.
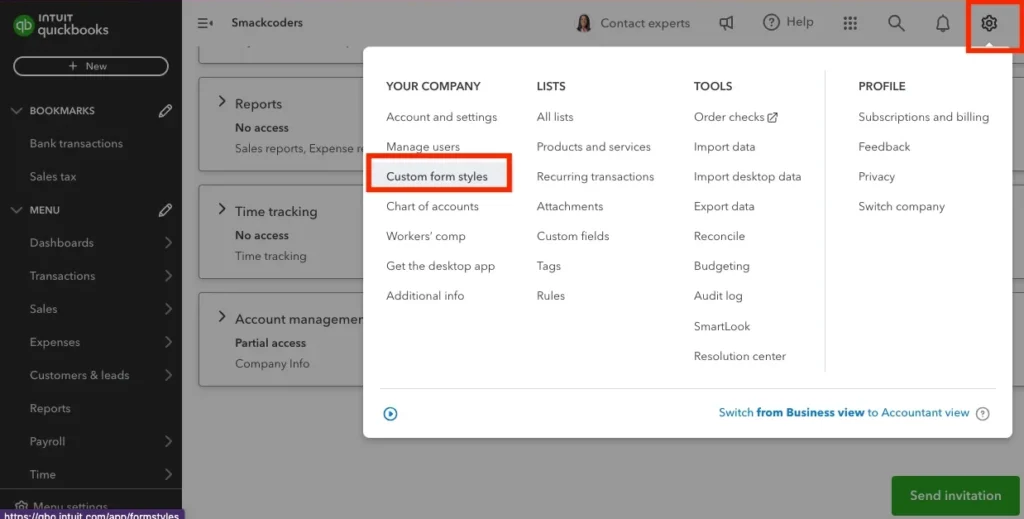
Accessing these options allows you to start personalizing your invoices immediately. QuickBooks offers a user-friendly interface that makes navigating through these settings intuitive.
Choosing and Customizing Templates
QuickBooks offers several templates that you can use as a starting point. These templates can be customized to match your business’s branding.
How to Choose a Template
- In the ‘Custom Form Styles’ section, select the ‘Templates’ tab.
- Look through the templates that are available and pick one that works best for you.
Customizing Templates
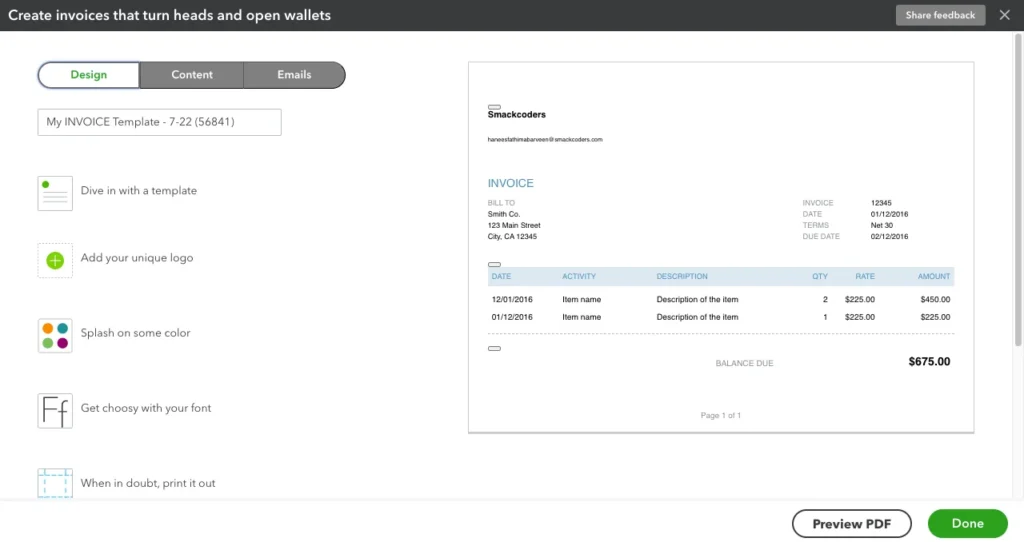
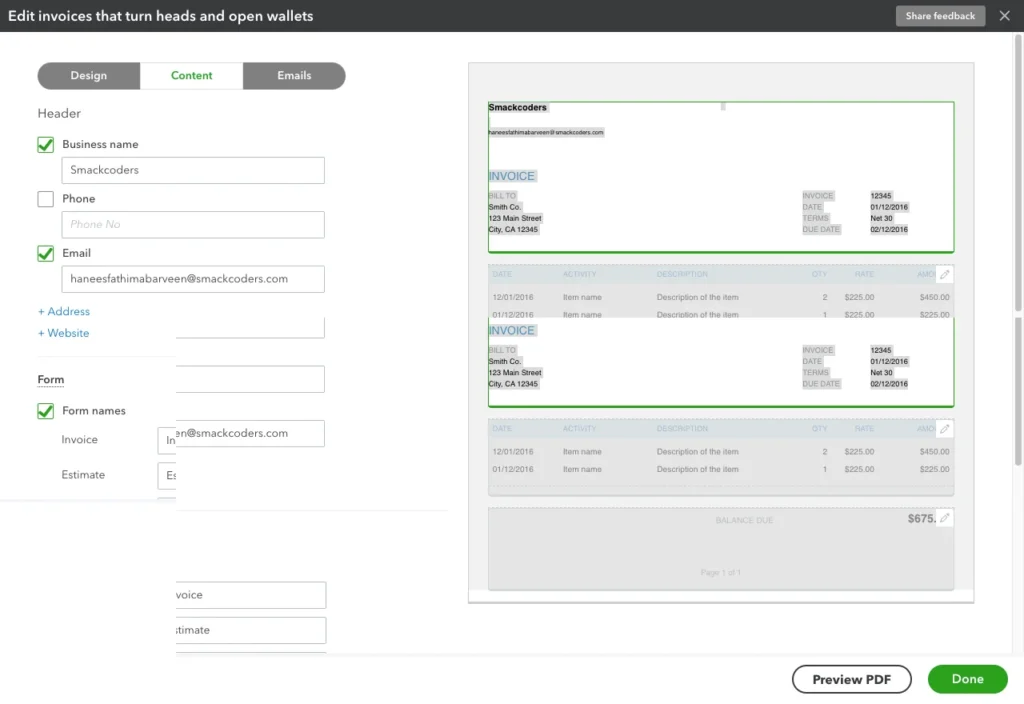
- After selecting a template, click on the ‘Content’ tab.
- Customize the header, table, and footer sections.
- Add your logo, change colors, and adjust fonts to match your brand.
Choosing and customizing templates ensures your invoices are both professional and reflective of your brand. You can also customize other elements such as the company name, address, and contact information to make your invoices more personalized.
Adding and Arranging Fields
Adding and arranging fields on your invoice allows you to include all necessary information in an organized manner.
Steps to Add and Arrange Fields
- In the customization menu, go to the ‘Content’ tab.
- Click on the area of the invoice you want to edit (header, table, footer).
- Use the ‘+Add’ button to include additional fields such as payment terms, due date, and item descriptions.
- Drag and drop fields to rearrange them as needed.
Properly arranging fields helps ensure your invoices are clear and informative. Adding custom fields relevant to your business can provide additional context for your clients and make your invoices more comprehensive.
Customizing Invoice Content
Customizing the content of your invoices involves editing the text and formatting to meet your specific business needs.
Tips for Customizing Content
- Use Clear and Concise Language: Ensure that the language used is easy to understand and free from jargon.
- Include Detailed Descriptions: Provide detailed descriptions of the products or services to avoid any confusion.
- Add Personalized Messages or Thank-You Notes: Adding a personal touch can enhance customer relationships and improve client retention.
- Highlight Important Information: Use bold or different colors to emphasize key details such as payment terms and due dates.
Customizing invoice content can enhance the professionalism and clarity of your invoices. Ensuring that all necessary information is clearly visible can help reduce payment delays and misunderstandings.
Setting Up Invoice Automation
Automating invoices can save time and ensure consistency in your billing process.
How to Set Up Invoice Automation
- Select an existing invoice if you have one or create a new one.
- On the detailed view of the selected invoice, navigate to the Manage icon.
- Click on ‘Make Recurring’ at the bottom of the invoice form.
- Set the frequency, start date, and end date.
- Save the recurring invoice template.
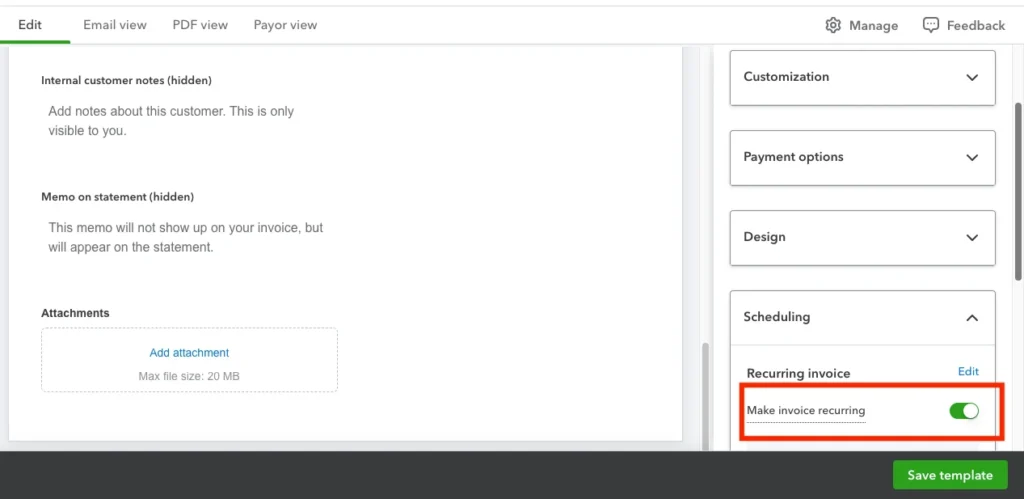
Automation reduces manual entry and helps maintain a steady cash flow. Setting up recurring invoices for regular clients ensures that invoices are sent on time, every time, without manual intervention.
Benefits of Automation
- Consistency: Ensures invoices are sent on a regular schedule.
- Time-Saving: Reduces the need for manual entry and follow-ups.
- Accuracy: Minimizes errors by automating repetitive tasks.
Integrating Payment Options
Integrating payment options with your invoices makes it easier for clients to pay you, thus improving your cash flow.
Steps to Integrate Payment Options
- In the invoice customization menu, navigate to the ‘Payments’ tab.
- Enable payment methods such as credit cards and bank transfers.
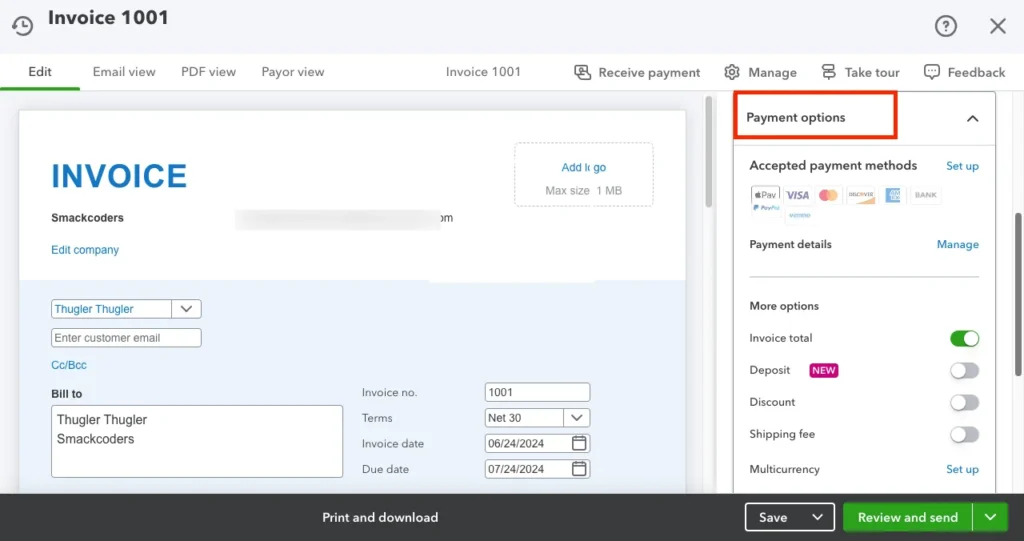
- Add a payment link or button to your invoice template.
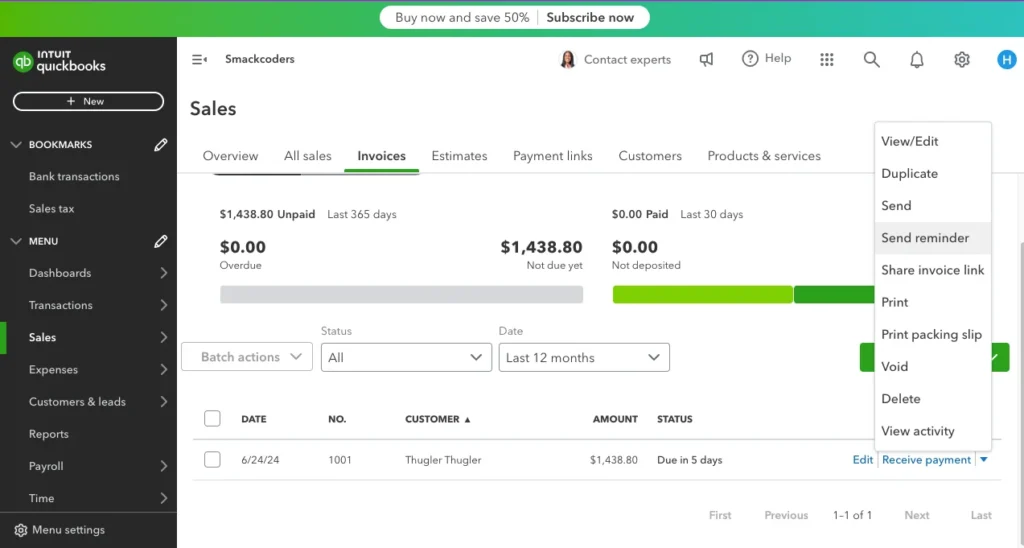
Offering multiple payment options can expedite the payment process and enhance customer satisfaction. QuickBooks allows you to integrate various payment gateways, making it convenient for clients to settle their invoices promptly.
Ensuring Secure Transactions
- Use Trusted Payment Gateways: Ensure that the payment gateways you integrate are reputable and secure.
- Encrypt Sensitive Information: Use encryption to protect customer data during transactions.
- Regularly Update Security Protocols: Keep your systems updated to protect against the latest threats.
Previewing and Testing Invoices
Before sending out customized invoices, it’s essential to preview and test them to ensure everything appears correctly.
How to Preview and Test
- In the ‘Custom Form Styles’ section, click on the ‘Preview’ button.
- Review the invoice layout and content for any errors or inconsistencies.
- Send a test invoice to yourself or a colleague for further verification.
Previewing and testing invoices help avoid errors and ensure a professional presentation. Checking for accuracy and consistency ensures that your invoices convey the right message and reflect your brand appropriately.
Making Final Adjustments
- Check Alignment and Spacing: Ensure that all elements are properly aligned and spaced.
- Verify Information: Double-check all details to ensure accuracy.
- Solicit Feedback: Ask a colleague to review the invoice and provide feedback.
Saving and Sharing Customized Invoices
Once you’ve customized your invoices, you can save the templates and share them with your clients.
Saving Templates
- After customization, click on ‘Save’ in the ‘Custom Form Styles’ section.
- Name your template for easy identification.
Sharing Invoices
- Create a new invoice using the saved template.
- Fill in the client details and invoice information.
- Click ‘Review and Send’ to email the invoice directly to your client.
Saving and sharing customized invoices streamlines the invoicing process and ensures consistency. By saving templates, you can easily create new invoices that maintain a uniform look and feel.
Exporting Invoices for Records
- Export to PDF: Save invoices as PDFs for easy sharing and printing.
- Store in Cloud Storage: Keep copies of invoices in cloud storage for easy access and backup.
- Maintain Organized Records: Ensure that all invoices are properly filed and categorized for future reference.
FAQs
How do I access invoice customization options in QuickBooks?
To access customization options, navigate to the Gear icon, select ‘Custom Form Styles’ under the ‘Your Company’ section, and choose ‘Invoice’.
Can I add custom fields to my QuickBooks invoices?
Yes, you can add and arrange custom fields in the ‘Content’ tab of the customization menu.
How do I set up automated invoices in QuickBooks?
Create or select an invoice, click ‘Make Recurring’, and set the desired frequency and dates.
What payment options can I integrate with QuickBooks invoices?
You can integrate credit card payments and bank transfers by enabling payment methods in the ‘Payments’ tab.
How do I preview my customized invoices?
In the ‘Custom Form Styles’ section, click the ‘Preview’ button to review the invoice layout and content.